
2nd Week of May: Hardening Off
We are watching the weather cautiously, knowing there is still a risk of frost on Cape Cod. But we are optimistic that soon we can plant out the more tender veggies.
This Week: A big week for hardening plants off! Lots of seedlings, whether you started them at home or purchased them, need to be readied for transplanting. For our veggie spotlight: a three sisters’ garden. We’ll also talk about fencing. Let’s get to it!

First, What Should You Be
Planting This Week:

Indoors
Indoors we are fertilizing our seedlings once a week with a weak solution of fish emulsion and watering with just water the other days. A fan is set up facing our seedlings to make the stems strong and keep away the dreaded damping-off pathogen.
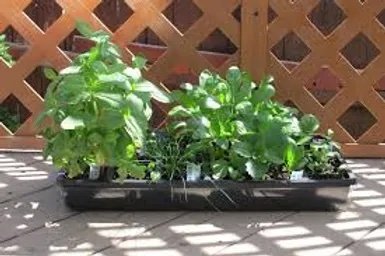
We are straddling the outdoors, with many crops in hardening-off mode. We are taking the trays outside to a sheltered area a few hours a day and then back indoors. Each day, increasing by an hour or two until they are out most of the day and indoors at night. It takes 7-10 days to get the seedlings fully acclimated to outdoor conditions. This is a very important step!
Outdoors
Many of those seeds you planted over the last 3-4 weeks have emerged, and there are a few things that need your attention:
Thinning—if your carrots, beets, etc, are coming up too thick, it's time to thin them to their appropriate density (check the seed packet to see how dense they should be planted).
Fertilizing—use a dilute solution of fish emulsion weekly on new seedlings to give them a good start. Also, plants that you transplanted out in the last few weeks can benefit from the same dilute solution.
To Fence, or Not to Fence

Putting up a fence can help keep some critters at bay and can represent some work and investment. Here are some things to consider:
Do you really need a fence? Maybe not. If you think animal pressures are low, consider relying on repellents and small barriers around prize plants.
Who are you trying to keep out?
Animals that hop and scurry—rabbits and small rodents can be deterred by lightweight wire or wood fencing. Make sure all holes and gaps are small enough. You can even use a strip of smaller-gauge wire as a second layer over the bottom of large fencing. Remember to tack down the bottom edge.

Animals that dig—groundhogs (aka woodchucks) require fencing that extends down beneath the ground to block tunneling. Trench to bury fencing a foot with an outward-bent apron to provide the best protection, but note that this requires more effort and makes the fence more permanent.
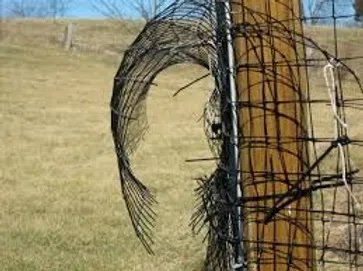
Animals that climb and fly—like birds, squirrels, chipmunks, and yes, sometimes woodchucks (yup, woodchucks can climb too!). Fencing with over-the-top netting can work, and we'll cover this later this summer related to protecting your berries. For woodchucks, a floppy top like the one pictured below can prevent them from making it over the top.
C-shaped fencing may be the best answer for your garden protection. Check out this video that demonstrates how it works.
Will it be permanent? More substantial fences (i.e., buried wire or in-ground wood posts) will likely be permanent. If so, choose materials that will last several seasons and that you don't mind looking at it all winter. Hardwoods like cedar are rot-resistant, and coated or galvanized metal or wire can be worth the investment. Alternatively, using thin wire fencing on metal posts lets you remove things after harvesting.
Veggie Spotlight: 3 Sisters’ Gardening
The centerpiece of the sisters is corn, with pole beans climbing up the corn, followed by squash growing at ground level. This farming technique draws from indigenous cultures throughout the Americas dating back millennia (here's some more history for the curious). Like most farming practices that survive across cultures and generations, the three sisters' garden succeeds by mimicking nature in important ways, including these
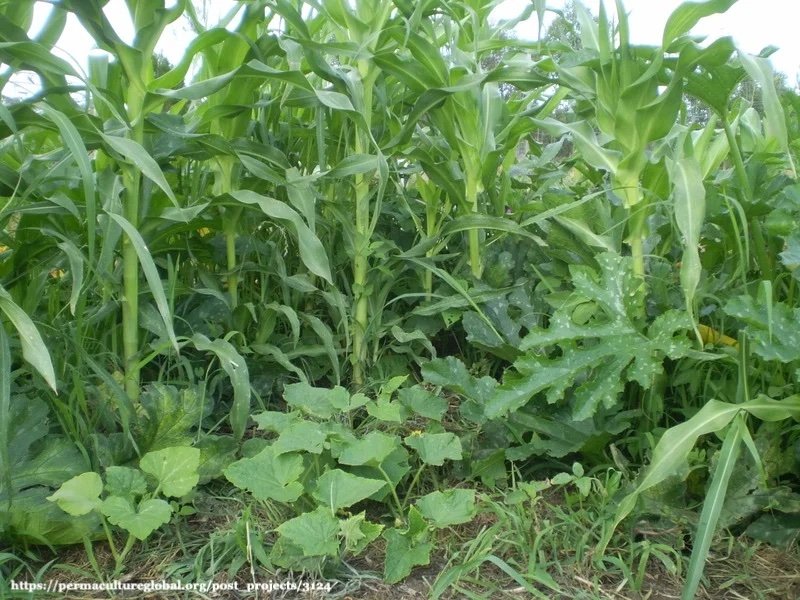
Polyculture (or companion planting)—-multiple species are grown in the same space, supporting each other and providing different functions. In the three sisters' garden, corn provides the beans a place to climb, while the squash acts as a living mulch—conserving soil moisture and excluding weeds —and the beans fix nitrogen into the soil for all three crops. Each crop takes up a different vertical space as well.
Planting in patches (have you ever seen a linear row of plants in nature?)—a patch arrangement is important for pollination, especially for species like corn that rely on wind to pollinate. Also, pest insects are kept in check with a diverse, multi-species patch where they can't move like wildfire through one crop.
Permaculture is really a repackaging of age-old wisdom about growing food using nature's guidelines to reap the benefits of synergistic relationships. Though permaculture emphasizes perennial plantings, you can still apply permaculture principles to annual veggie gardening with amazing results, as the three sisters demonstrate.
So how do you do it?
Form a mound, about 4 inches high and 3 feet wide. Mounds should be arranged in a rough grid pattern at least 4 feet apart. Now is a great time to mix in compost and soil amendments! All of these plants are heavy feeders.
Plant 3-5 kernels of corn (C) into each mound.
Once the corn is 6 inches tall, plant 1-2 beans (B) for each corn plant, about 4 inches out from the corn.
One week after your beans sprout, you can plant your squash (S), one on each opposite side of the mound.
To Recap Today’s Essential Concepts:
It's time to be hardening off those seedlings. Don't skip this step.
Thin overcrowded seedlings that have been direct planted in the garden. Give them the required spacing.
Fencing should be considered before it's too late!
Coming Up...
We will be thinking about planting seedlings outdoors if the weather has improved, and all but a handful of summer crops will be seeded directly. In the coming months, we'll shift our focus to outdoors to help you care for what's in the ground, from fertilizing techniques, and managing pests to plant-specific care.