
Early July: It's Time to Start Cooking
This week, we’ll explore the hidden tomato hornworm, composting, and a divine chocolate cake. As the summer kicks off, it’s time to start processing the yields of your garden, which means both the veggies in your kitchen and the waste products in your compost pile.

Tomato Hornworm
This week's spotlight is on the tomato hornworm, another hungry caterpillar. Hornworms are the most distinctive life stage of the five-spotted hawkmoth, Manduca quinquemaculata (say that five times fast). They are quite common in southern New England, and we get them on our tomatoes nearly every year.

Because of their extraordinary camouflage, you might notice them first via large, round, dark green droppings and badly eaten leaves on your tomato plants. These caterpillars have been known to munch other nightshade veggies like peppers and potatoes, but tomatoes are their favorite. Once you spot the worm, you'll wonder how you could've missed it! You might also wonder if it crawled out of the lab of a visiting alien spaceship.
Tomato hornworms can grow to 3 to 4 inches in length and eat voraciously. Left unchecked, a few of them can quickly ravage your plants. But, if you are attentive to signs of their presence, all you need to do is remove and dispose of them. You can drop them in a bucket of soapy water or just squish them (yes, their insides are as colorful as their outsides).

However, you should not remove a hornworm when it looks like this:

Those little white things that look like grains of rice are actually the pupal stage of the small braconid wasp, Cotesia congregatus, which is a parasite to the hornworm. When they hatch, the larvae will eat the hornworm and go on to lay their eggs on another worm to begin the cycle anew. These guys are on our side, so let them do their thing!
For a brief, clear, helpful guide to tomato hornworms, check out the University of Minnestota Extension’s web page on this critter.
Your Compost Pile
This time of year, you're probably yanking mounds of weeds from your garden and surrounding areas, so let's turn that into next year's compost that will enrich the soil and bring us yummy veggies.

To build your compost pile, you need two main kinds of materials:
Green (nitrogen-rich)

Fresh grass clippings—use only thin layers, as they can get slimy
Fresh weeds and flowers
Seaweed
Animal manure
Coffee grounds/tea bags
Fresh leaves—comfrey is great!
Brown (carbon-rich)

Dry leaves
Straw or salt marsh hay
Eggshells
Newspaper
Paper
Cardboard
Sawdust or shavings
Now that you’re clear on what you need to gather, here are some basic tips for starting or maintaining your compost pile:
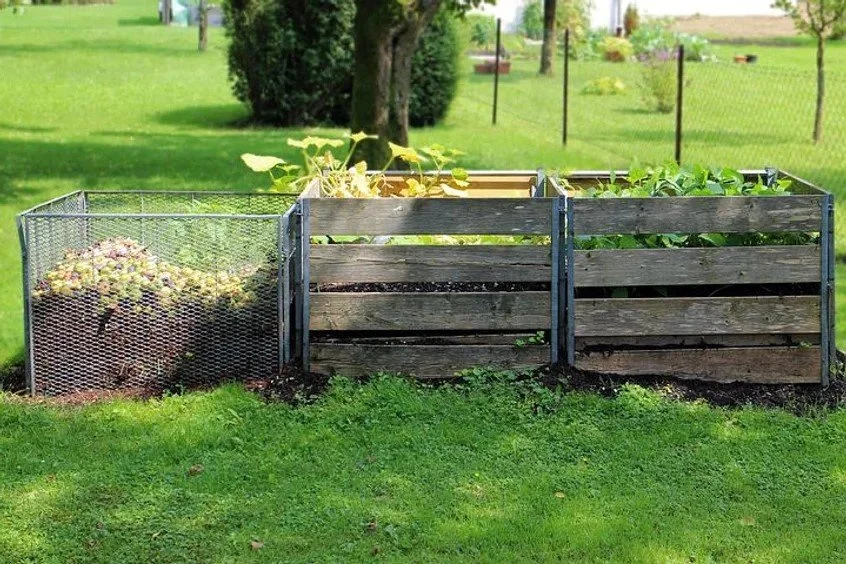
You can create a freestanding pile in a corner of your yard, or contain it simply and cheaply with either a wire fence made into a 6-ft-wide circle or with three upright pallets connected at the corners to create a U-shaped enclosure, with one side left open for access.
When adding material, alternate the green and brown layers. Use a 1:2 ratio by volume, one part green to two parts brown.
Don't add meat or bones, pet feces, or any processed food or you will attract unwanted marauders.
Water the compost pile every couple of weeks if it hasn't rained and after adding each layer. You want your pile moist but not soggy. Also, create your compost pile in the shade to avoid drying it out by baking in the sun. The microorganisms you want to encourage like a rich, moist environment.
If you're adding weeds to your compost, it's important to pull them early, before they go to seed. You don't want to incorporate weed seeds into your compost or you will be spreading next year's weeds when you use your finished compost. You will need to get the entire compost pile up to 145°F for 30 days to kill weed seeds. This is hard to attain, so just keep the weed seeds out from the start and you can take a more laid-back approach.
If your compost pile smells bad, you probably have too much green (or nitrogen) components and not enough brown (or carbon) components. Try to deconstruct it a bit, and if it's soupy and slimy, insert some more brown material into the pile.
If you don't turn your pile, you can expect the pile to mature after about 6 months of warm weather, after you stop adding to it. If you turn and mix the pile occasionally with a shovel or fork, the compost will mature faster.
The Pure Living for Life YouTube channel has a “Composting 101” video that tells a visual story of compost making.
Summer Harvest Is Upon Us
We are thrilled to be pulling veggies from the garden with more regularity and hope you are able to do the same! The first round of beets and carrots are almost ready but, remember, they store best in the ground, so you don't have to pull them all at once. Zucchini, however, will just keep getting bigger and bigger, so go ahead and harvest them and share them around. If you are growing leafy greens, hopefully you've been harvesting as needed for salads and the like.
Now that you've put so much time and energy into tending your garden, it can be overwhelming to know what to do with all that you've grown, especially if it comes all at once. Over the next few weeks, we will bring you some of our favorite recipes for eating your garden's bounty. Here’s one to start you off.
Recipe Ideas: Beets
Need inspiration for what to make with all those beautiful beets you grew? You can't go wrong roasting them in the oven with olive oil, rosemary, and garlic or even creating a beet and potato hash with poached eggs.

But our personal favorite for this yummy vegetable is chocolate beet cake. It’s super moist and dense. Here is the recipe we use:
Chocolate Beet Cake
Ingredients:
1 1/2 cups flour (all-purpose, whole wheat, almond meal, any gluten-free blend, or any combination have worked for us)
1/2 cup cocoa powder
1/2 cup sugar
1 teaspoon baking soda
1/2 teaspoon salt
1/4 cup coconut oil or canola oil
1 cup (or more) beets, boiled and pureed
1/2 cup milk (cow's, oat, rice, soy all work great, and you can even use water as a substitute)
1 teaspoon apple cider vinegar
Instructions:
Grease a 9" diameter cake pan and preheat your oven to 350°.
Combine dry ingredients (flour, sugar, salt, baking soda, and cocoa powder) in a medium/large bowl.
Melt the coconut oil (if using) and add to the dry ingredients along with beets, milk, and apple cider vinegar. Stir by hand. Depending on how much beet puree you added, you may need to add a dash or two more of milk to get the right consistency for a cake batter.
Pour batter into the cake pan and bake at 350° for 30-35 mins.
Let the cake cool completely before running a knife around the edge of the pan and inverting onto your cake plate. Ta-da!
For special occasions, we double this for a proper cake and have found the recipe to be very forgiving. So we encourage you to make it your own; vegan, gluten-free, or use butter instead of oil. Yum. Enjoy!
